Thursday, January 28, 2016

DX9 Radio Control Transmitter Redundancy Plan

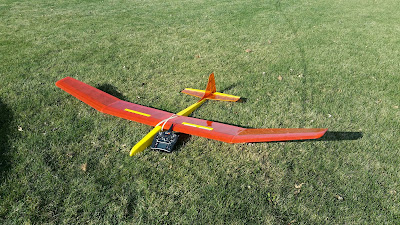
If you read definitions for the word – redundant it can imply both a negative and positive connotation. The negative definition implies waste such as repeating your thoughts in writing or speech. In looking at the engineering related sense of the word it implies a more positive idea in that it is strategy to effectively cope with failures. After a small issue with my Spektrum DX9 radio control transmitter I decided that I needed a redundancy plan and purchased a second DX9 transmitter. 


As I moved from the 72 MHz radio control systems to 2.4 GHz spread spectrum technology I decided that I needed a better strategy for the transmitters used to control my model airplanes. I had written about this previously in the blog article “Upgrading to Spektrum DX9 Transmitter. Basically I didn’t want to end up with so many transmitters of different brands and then have the batteries in the transmitter start to fail and have to do so many battery replacements.

SD Card in Transmitter

SD Card in PC to Download Code


With the 250 model memory of the DX9 I could control more models than I would ever have in a lifetime. At two dozen models saved in my DX9 I was way over the 10 model limit I had with a Spektrum DX6i. Now there was the chance if there was a problem with the single DX9 transmitter, I couldn’t fly any of my two dozen models. While reprogramming the DX6i might work; the elevator trim lever wasn’t working on that transmitter. 


Exporting Airplane Settings to SD Card

My first DX9 was repaired quickly at Horizon Hobby but I was afraid if this happened in the middle of the summer, the wait could be longer. With both of my Dx9 transmitters I decided I would try copying the settings from the first transmitter to the new one. This is done by using the SD card that is easily removable in the transmitter. I saved out the settings for one sailplane to the SD card in the old transmitter, put that SD card in the new transmitter and tried to import the settings. This gave an error message on the screen of the transmitter. 

Importing When Transmitter Code Levels Differ 


Like so many computer-controlled devices there is computer code in the transmitter that can be updated for bug fixes or enhancements. My old DX9 had the latest level of code but the new transmitter didn’t come with the newest level. I see this with the bios level in personal computers all the time too. What is different with the radio control transmitter is the serial number of your transmitter is somehow connected to the code and you MUST download the code for that serial number from the Spektrum website. I had tried to upload a code file saved from my first transmitter and it would not load.


This might sound rather overwhelming but it is really pretty easy once you go through it once. It gives the flexibility to copy any or all the model settings from one transmitter to the other one. Binding the transmitter to the receiver of the model will have to be done again if it was done with the other transmitter originally.


Computer technology, it is hard to escape it. 

Bill Kuhl

Related Articles


Tuesday, January 19, 2016

MN Tech Challenge Robotics

Last Sunday I braved the cold to check out the MN Tech Challenge Robotics at Mayo High School in Rochester Minnesota where I had graduated from a few years back, OK more than a few years ago. I also try to observe the MN Jr FIRST LEGO League competition once a year. About three years ago I had purchased a NXT Lego Robotics kit which I am still learning the basics with. MN Tech Challenge robots are larger and more advanced.

Robot Competition

In this article I am providing many links that will explain these sophisticated robots much better than I can. For this year there was a change in computing equipment used in the robots and the programming language.  Instead of using the processing unit of the NXT robot the new Tech Challenge robots use an Android phone unit programmed in the popular JAVA programming language that is used for so many applications. Students building a robot of this type will learn so many things electrical, electronic, mechanical and computer programming.

Android Phone Seen in this Image

Good Crowd of Spectators

At the competition I ran into the executive director of Hightechkids Cheryl Moeller that I have known for several years and she gave me an overview of the program. She introduced me to several people but I remember best talking to the young ladies that make up the robotics team “Iron Maidens”. In talking with them just a few minutes I picked up the excitement they had for the program and especially the outreach where they speak to other groups about robotics. In doing a search I found out they won the “Inspire Award” which is the highest award an FTC Team can receive.

High Tech Kids
Iron Maidens Gave Me Team Button


I am not going to provide an accurate description of exactly what the robots do in competition but it is my understanding the robots performs a portion of the task with no outside control and most of the time they are controlled through a joystick controller. There were balls and cubes that were pushed around and then the robots would try to go up a steep ramp. Some of them were shooting out a tape measure to hook a bar behind the ramp.

Climbing Steep Ramp


Bill Kuhl
http://www.ideas-inspire.com

Resource Links

MN Tech Challenge - High Tech Kids

Iron Maidens on Google Page

Iron Maidens Win Inspire Award 

Matrix Robot Components

Tetrix Robot Components

Wikipedia About JAVA Programming Language

About the Android Programming and Hardware Interface


Tuesday, January 12, 2016

OWIKit Air Powered Racer

After watching the video produced by my favorite hobby shop Everything Hobby in Rochester MN about building the OWIKit Air Powered Racer, I just had to purchase one there and build it. Jason that is featured in the video warns you this is an advanced build that could take several hours to complete. I thought it would be a fun challenge which it was, and somewhat different than other project kits I have assembled. On my http://www.ideas-inspire.com website, the project that uses water pressure, the Syringe Hydraulic Arm has been one of the most popular; the air powered racer would give me the opportunity to work with air pressure.


OWIKit Air Powered Racer


Air Gauge

 Looking at the contents of the kit, there are many plastic pieces and also tiny O-rings. Everything fits together and some parts are secured with tiny screws. I purchased a high-quality Philips screwdriver from the hobby shop which really helped in the assembly. The instructions consist mainly of drawings with very little text; at times it just wasn’t too clear how parts assembled, this require some trial and error fitting. 


Testing the Valves

The part that gave me the most trouble was getting the tiny O-rings in the check valve portion to seal properly. This is a spot in the construction where you must test what you have assembled by pumping it up against an air pressure gauge which is part of the car to see if it will move the gauge at least a certain amount, mine failed this test miserably. Jason helped me with this but I had to do additional fitting of the O-rings to get enough pressure.


These O-rings were a Pain Also


Total construction time was probably around the 4 hours that Jason estimated. I pumped the car up but could never get it to the high pressure indicated in the instructions. It did function and could power itself but so far has not gone as far or fast as the car Jason assembled. I did try replacing one length of included red tubing with model engine fuel line. This was a really tight fit and the car still seemed to be leaking. I tried putting soap where the tubing attached but really couldn’t detect any bubbles. 


I really feel a sense of accomplishment that I was able to assemble the car but a little disappointed that it doesn’t function better. No doubt I will take another look at this in the future, just getting a little too frustrated with it now.


Bill Kuhl
http://www.ideas-inspire.com

Everything Hobby Video of Air Racer


Wednesday, January 6, 2016

Sig Riser 100 - Part 1

I am thinking it was around 15 years ago I spotted a Sig Riser 100 kit in a local hobby shop and purchased the kit. After checking out the contents of the box and looking over the plans it went on a shelf in my basement. Around a year ago I decided I really needed to build the Riser and thought I would build the glider almost entirely using CA for adhesive. If this saved building time, I am not really sure as come spring it was far from complete. It did save on using pins, weight, and clamps to hold parts together. 


Sig Riser 100


Most of my building of balsa models for the last several of years have been the more delicate free flight rubber powered stick and tissue models. In constructing the Riser 100 I didn’t have to be as delicate in how I grasped each part but I still manage to break a wing rib or two.  After using CA, on each subassembly I would always check that all the joints were secure.  For the plywood fuselage pieces it would often take using CA kicker to get a good hold on the joints. In the higher stress areas I used epoxy. 


When I started building the Riser, I really didn’t want to deal with installing spoilers. So many people told me that I really needed spoilers so I decided to use a small servo for each spoiler in the wing halves instead of running string to a single servo in the fuselage as shown in the plans. The servo arms are extended and this pops the spoiler open, it worked well on another sailplane that I had been given.


I listened to other suggestions for the build and included big wing gussets at the end of the center section sheeting and also added carbon fiber on the top and bottom of the wing spars. For the hatch I used strong neodymium magnets in the rear instead of a nylon bolt. This appears to hold the hatch really tight but yet it is easy to remove and attach again.


Very late in 2015 I finished up the Sig Riser and was anxious to do some test glides so I headed to local park on my lunch. What could go wrong on a test glide, well on a little harder launch the Sig Riser 100 stalled and landed rather hard on one wing half. The transparent Monokote that I had done a pretty good job of covering with had a big rip in it. I was a little bummed out on that and decided to just tape it up with clear tape. After more flights I plan to recover the wing section but there could be more rips before I am really comfortable with flying a new sailplane.


Small Break After Sliding into my Foot

Before attempting and more flights I added some weight to the nose, this did help the handling. There was a cloudy Sunday with low wind but only slightly above freezing that I decided I would try some high start launches. I was very pleased how well it was flying, the glide was better than the two meter sailplanes I normally fly.  I made a landing towards myself and the sailplane just kept gliding, just as it landed in front of me, I realized it was going to slide along the ground farther than I thought. My efforts at getting out of the way were not completely successful as it hit one foot and broke a small chunk out of the leading edge. Another repair, I am hoping the minor bad luck with the Riser is all behind me now. 


Really looking forward to flying the Sig Riser 100 in the spring and see how well it flies in thermal lift. The larger sailplanes are more efficient but with a greater weight is increased kinetic energy when hitting the ground or your shoe.  I plan to be more careful on landings.


Bill Kuhl


Tuesday, January 5, 2016

Inspiring Myself in 2016 With Website Comments

If you read my last blog post in 2015; Recap of 2015 I was a little negative on the value of the science project ideas on my website http://www.ideas-inspire.com. After updating the website with the latest comment, it made me feel like I could be making a difference in student lives, I started reading more comments that were similar. Granted I receive some that are nasty which are never published. Some are amusing like this one: " ** I love looking at these comments they give me love and support for my job as a cat lady. I love kissing hobos in the moonlight and eating rocks :)"


I thought I would share some of what I considered the better comments to the website:


Mousetrap Cars  http://ideas-inspire.com/mousetrap-cars/

This was a great help for me in science or I probably would of failed science!!! Very descriptive and easy to understand as well. Thank you!!!

very helpful got an A on my project and im in 7th grade

very good I got our mouse trap car idea from this website thanks mr miller these are great ideas

this is so awesome broski

this website is so helpful!

Soooooooo helpfullllll! Actually it really showed me what I could do for my own
l love it so much i mad 24 cars i love the experiences it is life changing


Mousetrap Car Construction article     http://ideas-inspire.com/mousetrap-car-construction-article-and-plan/


Those moments mean the most to my students and me, but they are not valued by a system that focuses on preparing workers rather than thinkers, collecting data rather than teaching and treating teachers as less than professionals.


Syringe Hydraulic Arm   http://ideas-inspire.com/syringe-hydraulic-arm/


This page was very informational. My Pre-engineering class doing a project similar to this. I found this page while doing research for it. We will be making robotic arms for a battle ball competition using a magnet and magnetic balls.

I love it! It is the coolest thing ever. I was trying to do another hydraulic arm and you inspired me! Well done!!!!!!!!!

Its an awesome idea. I am working on it … Thanks for such a great idea.

Just one word to say awesome
very good representation ,simple and understandable. thanks a lot…………….

fantastic,i like it,am also completing my project,I think on hydraulic fluid it would be better to use brake fluid rather than just water.keep it up


Basic Aerodynamics With a Lesson   http://ideas-inspire.com/basic-aerodynamics-with-lesson/


There’s a good balance between clarity and thoroughness here. I’m looking forward to the further development of this promising learning resource.

Hi Bill, When I taught after school model airplane activities, I could have used this tool as an introduction to gliding and rubber power. Nice work. Someone out there could use this as part of a science lesson plan on beginning aerodynamics.
Nice content and thorough treatment of all topics relating to rubber band powered planes. Keep up the good work!

Very good , the art work helps get the idea across about the control surfaces
and the formulas give the science and math principals for all of them !!


Thanks for the thorough guide. My brother’s physics class had a contest of the longest flying plane and there was one contestant with foam flying surfaces. His plane was a bit slower but flew more stable and floated longer than the others.

Excellent advice and inspiration for helping kids to get into planes. I started as a kid in the early ’70’s buying stick rubber powered balsa planes. I forget the make but they were very light with very efficient propellors, looking like the SIG you show here. The wings and tail were 1/32″ thick and clipped into a simple plastic fitting which slid back and forth on the 1/4″ x 1/8″ medium balsa fuselage for balancing. The duration was pretty good and I used to experiment with making different sized wings and rubber motors. I used castor oil for rubber lubricant. I remember warping the wings and tail using my hot breath to create aerofoil lifting shape for the wings and making the tail turn or lift / dive. Great memories which in the fullness of time took me into a career in science and engineering. Keep up the good work. Steve


Bill Kuhl