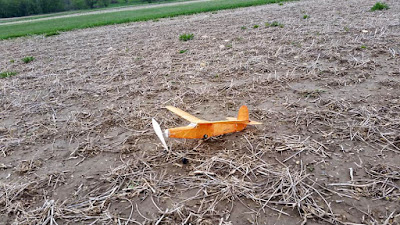
Construction is really typical of a stick and tissue model, the 3/32” square fuselage pieces were easier for me to handle than 1/16” square often used. I used a viscous DT timer built from a rotary damper I had purchased for under $3. For the first time I tried a wire in a tube bearing point for the front of the stab instead of just using rubber bands, it needed to be reinforced but might work out well. The model was covered in Esaki tissue and sprayed with nitrate 50/50 dope, the first model sprayed with my new airbrush system. Also the first time for using a wire to the front of the shaft freewheel system. For rubber I used 12 grams of 3/32” rubber braided.
When I finished the model I was anxious to fly it although there was snow on the ground, I took it along with me for a cross country skiing outing and did some short flights over the now. It sure wanted to fly, too much to the left and up. I assumed like many rubber models it would need some down and right thrust which I added. The next flights were better but it still needed more right, I put that into the rudder. If the turn was gentle if flew nice but if too severe a turn it would hit the ground which was not snow covered any longer. The long landing gear broke loose from the bottom of the fuselage easily. I fixed it many times. After so many times I just rubber banded the gear to a cross piece in the fuselage, this saved the plane from further breakage. The nose area was taking a beating too and I did some reinforcing there, the balsa tends to compress and then the thrust settings change. I now have some thin plywood in the contact areas around the propeller hub.
Further flights were really inconsistent, sometimes the plane would not have enough right turn and other times too much and it would do a slow spiral into the ground. I would patch up the plane and just keep trying again. For the landing gear issue I ended up just adding another cross member of hard balsa and then gluing the wire to it with UHU POR glue. This glue has some elasticity and the landing has stayed intact through many flights.
 |
| Major Rebuild |
The turning point came when the fuselage broke in several places after a crash. I was tempted to destroy the plane and save myself further aggravation. After thinking to myself I was not going to give up, I ripped most of the covering from the fuselage and made repairs. Much of the vertical fin was redone and a small rudder tab was created. The amount of right thrust was decreased too; I feel that might be part of the issue too. As had been recommended I moved the rear peg up further because the rubber in the narrow rear part of the fuselage was ripping the tissue. This moved the CG forward a slight amount requiring more incidence but the recovery from a stall was much better.
More flights with hand winds showed great promise, no crashes under power. Flying on several days the trim appeared to stay pretty much unchanged. Recently I had a larger site to fly from and I made several flights using the winder gradually getting up to 400 turns. The plane handled greater torque fine, the glide might need a little tweaking yet. I really feel a sense of accomplishment and that I have learned much from working with this airplane. In the future I plan to build another one from the Volare short-kit and try to use the knowledge from the first one to build a better version from the start.
Bill Kuhl
http://www.ideas-inspire.com
Check Out my New Viscous DT Tutorial for Students
https://ideas-inspire.com/viscous-dt-tutorial/


No comments:
Post a Comment